I've always been a crafty person, or a "Becky Home-ecky." I love to cook, bake, sew, crochet, and scrapbook. See my various creations here.

Tuesday, August 31, 2010

Birthday Cakes

I have two more cakes to show you, and then I'll get back with the paper crafting tomorrow! Promise! My daughter has started 1st grade this week, so I will have more time to be crafting and blogging!

The first cake is for my friend's son's 6th birthday. He likes Batman just a LITTLE! He was having a Classic Batman party, and I was asked to make the cake. I printed out the Batman symbol online, cut it out, and traced it onto the cake top.


I just bought the Wilton checkerboard cake set and really wanted to try it out! My husband and I had the cool idea to make the inside of the cake represent Joker. To make the batter, I made a simple lemon cake batter and divided it into two zip top bags. Then I added green coloring to one bag and purple to another. If you follow the directions on the Wilton Checkerboard Cake set, you will end up with this gorgeous cake that people are sure to be surprised with!


The next cake I want to show you is for my friend's birthday. He loves zombie movies, so I decided to make him a zombie cake! I found a lot of versions of this cake online. I don't know who the original idea comes from. I made homemade marzipan for the fingers, formed around lollipop sticks. Then I used frosting to put the almonds on as nails. The "dirt" is ground up Oreo cookies.


I hope you enjoyed some of the other types of crafts I like to create. Back to the cards tomorrow!

Monday, August 30, 2010

Monster's Tea Party

My kids' birthdays are both in April. While I love having their birthdays close, and getting all the birthdays in the family over with early in the year, it is pretty stressful to make cakes and other things one right after the other. Not only that, but Easter was in April this year as well. It's ok. I got all done, with two successful parties!

My daughter wanted a bear birthday party. Then, of course, she changed her mind to a tea craft party after I ordered some things. Luckily, I was able to meld the two ideas together. Anna's birthday was a lot simpler than Leif's. (See yesterday's post) She wanted some friends to come over for a slumber party, have "tea party food," and craft. I bought a few crafty things online for them to do, including: painting ceramic bear banks, sand art, and making their own t-shirts.


The invitations were really simple. I used Stampin' Up! paper and supplies, including punches and the Circle Scissor Plus. I free-formed the handle and spout of the teapot.

The food was the real fun part of this party! I made everything small and dainty for the girls. Most of the food was gone by the end of the night, so that's a good sign! We made chocolate covered strawberries, mini quiches, mini muffins, mini pigs in a blanket, mini cookies, and cucumber sandwiches. Then the girls got to make their own mini pizzas for dinner.


For the cake, I baked about 3/4 of a recipe of batter in a greased/floured Pyrex bowl. I frosted it in bright pink butter cream, and then made flowers out of M&M candies. The spout and handle were free-formed. The cute candles were bought online.


My favorite part of this party was how much my daughter was able to help me to make everything. She decorated her own cake, and made most of the food for her party.

Sunday, August 29, 2010

Chain Chomp Crochet Hat

As I told you in yesterday's post, my son is in love with the Mario Bros. We also had a very long winter here, with many hats gone missing. Because of this, I found myself crocheting hats left and right for them! I was browsing the internet one day and came across: http://www.knittingninja.com/patterns/chain-chomp-hat/

How awesome is that hat?

Well, I am not very talented with my knitting. I prefer to crochet, so I fiddled around, and was able to create my own crocheted version of Knitting Ninja's awesome idea! I live in Germany, with a limited supply of yarn and other supplies, so I made do with the yarns in my stash.

My son refused to model, so here is my daughter. Cute, huh? I might just need to make one for myself a little bit bigger.

Saturday, August 28, 2010

Mario & Luigi Birthday Party

The family and I are taking vacation time for the last week of summer break. Because of this, I haven't had time, nor energy, to stamp! So, I will be posting a few of my other endeavors. I hope you enjoy!

When the new Mario Bros. Wii game came out this year, my son instantly fell in love with Luigi. I don't know if it's the color green, or the fact that Luigi has a huge L on his hat (my son's name is Leif,) but something clicked in his mind and made him fall in love with everything Luigi and Mario!

I go just a little overboard with my kids' birthday parties. I am just unstoppable! But who wants to stop when it's so much fun? First I started with the invitations. I wanted to make something Nintendo, so thought of a DS. I printed the picture from the internet, but the rest are Stampin' Up! supplies (some retired).

When we delivered the invitations, the kids LOVED them! If you'd like instructions, just ask. I'd be more than happy to share how I put these together.

I also made thank you cards. I like to make them before the party, so they are ready to send out the Monday after the birthday. I will forget otherwise! The kids made these notes, using Stampin' Up! punches, stamps, and markers.

As each kid arrived, they got to pick a Mario or a Luigi hat to wear. These hats were bought at the German version of a Dollar Store. I could only find red and white hats, so we dyed the white hats Green with Rit dye. Then I cut the circles and letters out of felt, hot glued them together, and then glued them on the hat. Also, for the first game we played, the kids earned a yellow coin box with a slit in the top. These were made with Stampin' Up! products. Ask if you'd like the instructions.

For games at the party, I thought of a few different Mario-esque thing we could do. I made pictures of different Mario characters (free-handed them onto poster board and cut out). I then taped the large wooden skewers you can find at the grocery store onto the back and stuck them into the lawn in different areas. That way, when it was time for a different game, we could just tell the kids, "Go to Yoshi!" For each game, the prize was golden coins that could fit into the golden coin boxes.

The games were:
  • Bowser-We put a 1x4 down on the ground and had the kids walk across the "bridge" and then they got to choose fire or ice balls (red or blue bean bags) and had to throw at a picture of Bowser.
  • Yoshi Egg Hunt-Colored big Easter eggs with spots (used a Sharpie). I then drew simple pictures on a card that showed where the eggs were and each child got a card. (So a picture of an egg sitting near the swingset, or an egg by the mailbox).
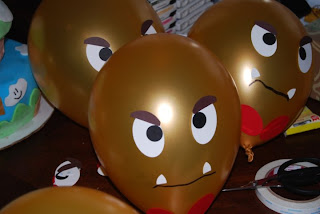
  • Goomba Smash-We decorated balloons to look like Goombas. Each had two chocolate coins inside and the kids had to sit on them to smash them.
  • Chain Chomp Pinata-I took a soccer ball pinata from the store and ripped off as much of the paper mache as I could. Then I painted a chain chomp on it.
  • Save Princess Peach-This was the last game. We hid Mushrooms around the yard with clues on them. We had the older kids read to the younger ones as they ran around the yard to find the next mushroom. The last mushroom led them to Princess Peach and a treasure chest full of goodie bags!

My favorite thing to do, and what I pride myself most in, is the cake. I looked online and couldn't find one that was feasible for me and my limited resources, so I combined a few of my favorite into one cake. For the mushroom top, I used the Wilton Cupcake pan. The bottom was, I believe, 9" round pans. Both cakes were frosted with butter cream frosting, and then covered in fondant. I hand-dyed the fondant using Wilton colors.


The party went over really well, even though it was a very cold and windy day. All the kids had a blast, and they all loved recreating the Mario Bros. games!

Friday, August 27, 2010

Mix & Match Monster Book & Tutorial

With almost all the husbands/dads deployed from our area right now, moms are frantically searching for activities to keep as busy as possible. Move, move, move, and it will seem like Daddy was gone for no time at all, right? At least we all hope that's how it works! Because of this, I really wanted to start having a monthly Mommy & Me crafting class. I love sharing Stampin' Up! with my children, and I would love to help other moms craft with their kids as well.

Thinking along the lines of children, I decided to try my hand at a thought I had when I very first saw the new Idea Book & Catalog in June: a Make a Monster Mix & Match Book! "A What?!?" you say. Remember growing up and we had those books with the pages cut in horizontal lines, and you could make the characters wear a silly combination of clothes, or make silly faces? One of THOSE books!


The book has four complete pictures of different monsters, and you can flip the different sections up to create many different combinations, and hours of giggles from your children.


I kept the project fairly simple so I could have a wider age range of kids participate in the class. While it is simple, it is a little complicated to explain, so I wrote a tutorial for it. Please feel free to have a class of your own. Be sure to add a comment with a picture of what you and your attendees created!

Contact me for any more information on this project. If you would like me to teach this class to you and your kiddos, please email me. Or click to purchase any of these products!

Supplies Needed:

Paper:
Very Vanilla 3 ½ x 2 ½ (4)
Chocolate Chip 7 ½ x 3 (1)
Very Vanilla (Size you want for cover)
Greenhouse Gala DSP (size for cover)

Stamps:
Make a Monster
Rough Type

Ink:
Basic Black
Assorted Stampin’ Write Markers

Accessories:
Large Grommets (3)
Very Vanilla Ribbon

Tools:
Crop-A-Dile
Paper Trimmer
Bone Folder
Stamp-a-ma-jig handle
Clear Blocks A & C or D
Craft & Paper Scissors

Adhesive:
Snail Adhesive

Thursday, August 26, 2010

Recycling Thursday

How about a new challenge. Are you up to it? Post a comment with a link to your project!

Anyone who has been crafting for longer than...1 hour I guess...has a pile of things to be reused. I have drawers and drawers of scraps, bits of ribbon, buttons and brads with no partner, and experiments that I never put onto a card. So, my challenge for you, is to go through your scraps and see what you can reuse! I know a treasure is waiting in your stash.


Here is what I came up with:


The only thing not in my scrap stash was the card base. Everything else was in my reuse or scraps piles!

The background I made a long while ago. To make this background, prepare to make a mess! Also, be prepared for it to smell for a couple days. It is a technique using vinegar and icing sugar!
  1. Mix 1 part vinegar to 2 parts icing (confectioner's) sugar
  2. Use a paint brush and liberally paint it over your card stock
  3. Drop different colored reinkers randomly around your cardstock
  4. Wait for it to dry, then brush off the extra sugar
The reinkers will burst along the paper, and the sugar leaves pock marks and crystals. It is very pretty, and is well worth the smell and waiting time.

Going back through my scrap drawer, I thought that this looked an awful lot like a galaxy or nebula. What better stamp set to go with that type of scene than Greetings, Earthling? I just love these adorable aliens.

To make the planet on the bottom, I free-formed a round shape. Then I took a piece of scrap paper and punched various random circles around. Keep the parts that you punch out. I then held the holey piece of paper up to my rounded shape and sponged on ink (crumb cake). Then I used dotto to put the circles I punched out back over where I just inked,and sponged on Old Olive in onto the planet surface.

A little Snail, some dimensionals, and you have yourself a card saved from the recycling bin!

What can you come up with? Show me your scraps!

Contact me if you are interested in learning more about the techniques on this card, or in purchasing any of these products!

Paper:
Old Olive
Crumb Cake
Whisper White

Stamps:
Greetings, Earthling

Inks:
Crumb Cake
Old Olive
Various Reinkers
Various Markers

Adhesives:
Dimensionals
Snail

Tools:
Various Circle Punches
Paper Snips
Paper Trimmer
Sponges

Other:
Vinegar
Confectioner's Sugar

Wednesday, August 25, 2010

Top Secret Mission Folder with Tutorial

My kids love to have quests. We call them "missions" in our house, and they love if they can be "secret missions." We are going on a camping trip, so to get them excited for the trip, and to get them to help with the prep work, I made this "Top Secret" folder for their mission they are going to do with Daddy this weekend. You have to rip open this extra secret mission agenda to find the checklist!Then there is another secret pocket on the back that has the final clue to what they are doing this weekend!


I have made a tutorial for this project, and you can download it here. I would love to see how you take this idea and change it! Post a comment with a link to your work.

To order the supplies for this project, click here!

Tuesday, August 24, 2010

Teacher Gifts

My favorite memories as a child is when my mom was able to come and do things at the school with me. She was Class Mom and always had treats, crafts, and other fun things for the class. Because of this, I try to do the same for my kids. I start at the very beginning of the school year, with giving the teacher a back to school gift. The first day of school is hectic for everyone. A teacher's wish? The best kids in the world. Since she already has my daughter in her class, I will give her the second best thing: chocolate!


The bag of candy and the card both use the First Day set from the Summer Mini. This stamp set is only available until August 31st! You don't want to miss out on this stamp set! It's perfect for cards, gifts, and scrapbooks. Click here to buy it now!
 

My daughter, Anna, made the card. I cut everything out how she wanted it, and I let her put everything down. The punched apples are so easy and cute. Simply use the Round Tab punch in both Whisper White and Real Red. Tear the ends off the red and adhere to the white. Then I used the very edge of the 5-Petal Flower punch to make the stems. Use the side of your Basic Black marker to make your seeds, and you are done! To make the worm, my daughter wanted to use Stampin' Write Markers. She simply stamped the worm on Whisper White cardstock, omitting the words underneath the worm. Then she colored in the stamped image.
 

For the apple, I cut out a 4" circle from my Circle Scissor Plus. I then used the very top of the Full Heart punch to make the bottom, and the Large Oval punch for the top. I made the stem and the leaves out of the 5-Petal punch. Then I used my paper snips to round all the corners on the apple. I stamped the small apples from the First Day set in Versamark all over this apple. Then, because I didn't punch enough yet, I used the Extra-Large and Large Tag punches, the Fancy Flower punch, and the 1 3/8" Circle punch.

To color the worm, I used Watercolor Pencils and a Blender Pen. I put it on the Fancy Flower punched from Greenhouse Gala DSP, and popped it up with Dimensionals, sticking the end of the Linen Thread from the tag underneath.

I filled a Medium Flat Cellophane Bag with M&Ms, closed the top with Sticky Strip, and then adhered my Apple with Sticky Strip as well.

This treat is sure to help relieve some of the stress from Anna's teacher's first day!

I would love to have a workshop at your house so you and your friends could make these for your kids' teachers! Contact me today to schedule. Or, you can purchase any of these products.

Paper:
Real Red
Pear Pizzaz
Early Espresso
Whisper White
Greenhouse Gala DSP

Stamps:
First Day

Markers/Pencils:
Basic Black
Early Espresso
Pear Pizazz
Real Red
Blender Pens
Watercolor Pencils

Adhesives:
Dimensionals
Snail
Sticky Strip

Accessories:
Medium Cellophane Bag
1/8" Early Espresso Taffeta Ribbon
Linen Thread

Tools:
Scallop Circle Punch
Fancy Flower Punch
5-Petal Flower Punch
1 3/8" Circle Punch
Large Oval Punch
Full Heart Punch
Large Tag Punch
Extra-Large Tag Punch
Round Tab Punch
Circle Scissor Plus
Paper Snips
Paper Trimmer
Craft & Paper Scissors
Craft  Rubber Scissors

Monday, August 23, 2010

Photo Purses

Two days ago I talked about one person I met at Founder's Circle last year. This is another project from a friend I made. To learn more about how YOU can earn an absolutely FREE trip full of Stampin' Fun, ask me!

Anyway, this project is from Frenchie. You can visit her video tutorial here. In January she posted a video tutorial of a cute photo purse on www.stampinconnection.com. This is a Stampin' Up! demonstrator only website full of ideas, pictures, and forums. Just one of the many perks of being a Stampin' Up! demonstrator!.

On with the craft! These purses are made from chocolate chip and whisper white paper. You can find all the demensions and scoring information through Frenchie's video link above. We finished the tops with eyelets and the beautiful Organza Ribbon.


We used the Greenhouse Gala DSP for the accent papers. You can put as many pieces you want, or can cover every little bit in pictures! For my son's purse, I used Pear Pizzazz and Pumpkin Pie mats under the three main pictures.


I had some time with just my daughter, Anna, and decided to craft with her. She's only 6, but is on her way to being a Stampin' Up! demonstrator already. She loves to craft with me, and is rather good. I did the measuring and folding, but she cut her own paper and glued it all down. She picked out the stamp set for her cover, and colored that as well! If she can do it, you can too!


Now that you've seen these cute photo purses, want to make your own? I would be happy to teach you and your friends in a class! Contact me to schedule when works for you! Or click here if you are interested in purchasing any of these products!

Paper:
Chocolate Chip
Whisper White
Greenhouse Gala DSP
Pumpkin Pie
Pear Pizzazz

Stamps:
Broadsheet Alphabet
Rough Type Alphabet
Choo Choo
Because I Care

Inks:
Versamark
Baja Breeze
Chocolate Chip
Pear Pizzazz

Adhesives:
Snail
Magnet Sheet
Sticky Strip

Accessories:
Clear Embossing Powder
Silver Embossing Powder
Metallic Eyelets
5/8" White Organza Ribbon

Tools:
Scallop Trim Border Punch
Paper Trimmer
Heat Tool
Bone Folder
Embossing Buddy
Powder Pal
Crop-A-Dile
Craft & Paper Scissors

Sunday, August 22, 2010

Open House Love

I was invited to participate in an open house for direct sales companies last weekend at my friend's house. It was for people to walk around and get a feel for projects. I wanted people to get Stampin' Up! stuff in their hands to play with, so created this small love note.


This very simple card is perfect to slip into care packages for the loved ones downrange! I wish I would have taken my camera. You should see what the women created! Even those who swore, "I'm not creative" outdid my card by miles! Are you one of those? Host a workshop today, or come over to my house, and I'll PROVE to you that you CAN be crafty! Stampin' Up! makes it so easy and fun.

Keen eyes may notice, this ribbon is no longer available. :( The 5/8" Early Espresso Grograin ribbon would look just as lovely. My box of new catalog products hadn't come in yet. (Thank you, Kelly, for letting me borrow this stamp set for the open house!)

Contact me if you are interested in learning more about the techniques on this card, or in purchasing any of these products!

Paper:

Pretty in Pink
Very Vanilla

Stamps:
Punch Potpourri
Fundamental Phrases

Inks:
Chocolate Chip
Rose Red
Pretty in Pink

Adhesives:
Dimensionals
Mini Glue Dots
Snail

Accessories:
5/8" Grosgrain Ribbon

Tools:
Paper Snips
Paper Trimmer
Craft & Paper Scissors
Full Heart Punch
Heart Small Punch
Big Shot
Perfect Polka Dots Embossing Folder

Saturday, August 21, 2010

Matchbook Scrapbook

Last year I had the absolute pleasure of going to the Founder's Circle incentive trip to St. George, Utah. I met many fabulous women there. One was Dawn Raspas who started UStamp. U Stamp is a group of designers who make wonderful projects. Go check it out!


One of the project tutorials is a Matchbook Album (because it folds up like a matchbook.) This album was 12 inches long, and had a lot of spots for wonderful pictures!

Well, I made this album, and then found that I didn't have enough pictures to really do the album justice, so I cut it right in half. Using the tabletop paper cutter, I just sliced it. Now I have an album to give a friend, and this gorgeous one for myself!

I used the Sunny Garden DSP. I was so sad to see the Cottage Wall DSP leave the last catalog, and now here it is just with different colors! Hooray! I have at least one more year with the beautiful designs on this lovely paper. I filled the album with pictures of my Anna Monster. She is obsessed with butterflies, so this theme really does fit her. I love making small scrapbooks like this with my leftover pictures that didn't make it into a scrapbook page. My kids really like that they can hold these, flip them open, and show their friends. This is also a perfect project to make with your kids.

The inside of this scrapbook holds up to 9 pictures (I made it so it holds 7). Want to see?

Interested in making this album? Click the UStamp picture above and find out how! This is only one of the cool tutorials available!

Want to set up a class to learn how to make one of these? Or want to purchase the products to make it? Contact me!


Paper:
Whisper White
Sunny Garden DSP
Poppy Parade
Daffodil Delight
Pear Pizzazz
Peach Parfait

Stamps:
Cottage Garden
Rough Type

Inks:
Poppy Parade
Daffodil Delight
Pear Pizzazz
Peach Parfait

Adhesives:
Snail

Accessories:
Poppy Parade 1/2" Stitched-Poly Ribbon

Tools:
Paper Trimmer
Tabletop Paper Cutter
Big Shot
Beautiful Butterflies die
Beautiful Wings Embosslit
Stapler

Friday, August 20, 2010

Gorgeousness!

I'll admit. I don't like to spend hours on a card. I admire the work of others online, but I really like my cards to be quick and simple. Well, I broke all my rules with this card! It took me two days of coloring, drying time, planning, mistakes, and fun! This, however, may be my favorite card I have ever done! Ready to see?


The picture does not do the sparkles on this card justice!

Let me tell you the story of this card: I was watching "Barbie: A Mermaid Tale" with my daughter (I think it should be "Tail" not "tale," but I digress.) Anyway, Barbie has this really cute flower on her outfit at the end of the movie. It's brown, edged in gold, with a pink center. Well, I tried to color the Paper Daisy brown, dye the flower brown, and stamp a flower brown. The flowers looked good...until I tried to put gold on only the outside edges. It was a mess!

So I pulled out an all-time favorite: Shimmer Paint!

To make your very own flower:
  1. Take a Paper Daisy and use your Stampin' Write marker to color all of the petals.
  2. While waiting for that to dry, punch one scallop circle from paper of your choice.
  3. Use your paper snips to cut in on each swoop towards the center.
  4. Spray this flower with Smooch Spritz until it is pretty wet and sparkly
  5. Wrinkle up the flower and flatten back out.
  6. Wait (impatiently) for everything to dry.
  7. Then take Champagne Mist Shimmer Paint and a small paint brush and brush all over the Paper Daisy
  8. Again, wait for this to dry.
I used Mini glue dots to adhere the flower together, and to stick it to the card.

For the background, I used the Pretty Petals background stamp. I inked it up in Regal Rose ink, and then painted Champagne Mist Shimmer Paint all over. Carefully stamp and lift to avoid smudging. This will take a little bit to dry as well.

Finish the card off with gorgeous Victoria Crochet Trim, a saying from Herb Expressions, and a Designer Button, and you have yourself your own Gorgeousness!

Contact me if you are interested in learning more about the techniques on this card, or in purchasing any of these products!

Paper:
Regal Rose
So Saffron
Very Vanilla

Stamps:
Herb Expressions
Pretty Petals background

Inks:
Regal Rose (Marker & Ink Pad)
Champagne Mist Shimmer Paint
Gold Glow Smooch Spritz

Adhesives:
Dimensionals
Mini Glue Dots
Snail

Accessories:
Victoria Crochet Trim
Paper Daisies
Designer Buttons
Linen Thread

Tools:
Scallop Circle Punch
Paper Snips
Paper Trimmer
Craft & Paper Scissors

Choo Choo Scrapbook

I have a workshop this weekend for a woman with twin baby boys. She wanted to make a scrapbook for her workshop, so here is this 6x6 page using the adorable Choo Choo stamp set and coordinating Right on Track wheel. I based this scrapbook page from the card on page 80 of the Idea Book and Catalog. Not only proving that the IBC is a great resource tool for inspiration and ideas, but also how versatile Stampin' Up! products really are!


To make the train on the track, I used a technique called "masking." First, you stamp what you want in your foreground (the train.) Then you stamp that same image(s) onto a scrap piece of paper and cut out with paper snips. Use Dotto Adhesive to temporarily stick the scratch paper over the stamped image. Then wheel or stamp over how you want. Remove the scratch paper, rub off the Dotto residue, and you have a beautiful masked image!

While a 6 x 6 page is perfect for a workshop setting, I take far too many pictures to fit onto one tiny page! So, I expanded this page into a 12 x 12 and will give this to my hostess as one of her gifts for hosting her workshop.


At all of my workshops involving scrapbook pages, I try to make what's called a "progressive" page to show. This page goes from a 6 x 6 to an 8 1/2 x 11, to a full 12 x 12 size. While difficult to see on this page, the 8 1/2 x 11 sheet is versamarked with the puff of smoke all over just to add some more dimension. When it is filled with pictures, this is sure to look perfect in a scrapbook, or framed on the wall!

Contact me if you are interested in hosting your own scrapbooking workshop, or in purchasing any of these products!

Paper:
Bashful Blue
More Mustard
Very Vanilla
Bravo Burgundy

Stamps:
Choo Choo
Right on Track (Wheel)
Broadsheet Alphabet

Inks:
Chocolate Chip (Reinker, onto wheel cartridge)
Bravo Burgundy
Versamark

Adhesives:
Dotto
Snail

Accessories:
Very Vanilla 1/8" Taffeta Ribbon

Tools:
Stampin' Around cartridge and handle
Paper Trimmer

Black and White Garden

Let's get blogging!

Last time I tried this, I would forget about posting, and I gave up with it. So, let's try again! I can't promise I'll post every day, but I will try to keep up with putting my projects on here.

For the card today, my friend and downline, Kelly Mayou, came over and said she needed to make a black and white card. I decided to try my hand at it as well! Last time I was in Berlin I noticed that many of the shops along the streets had black and white clothes and styling. I have been meaning to make a black and white card for a long while! I noticed that the window scenes often were of flowers as well.

I went to one of my favorites: Greenhouse Garden! I love this stamp set. It is beautiful in vibrant colors, and it is beautiful in black and white as well!


I started by background stamping. I did the small flower by inking in black, then stamping off on scratch paper, and then stamping on the card base. The center of the flower is straight black ink.

Then I embossed the center of the big flower in white and stamped the big flower in black over. This is a cool technique called "emboss resist." The ink will not stick to embossing powder. Try it. You will like it!

I sponged around the edges. I always forget to do this, but I think it really does add to the layers of a card.

The final detail is the paper piercing on the corner using the mat pack to get the dots lined up just perfectly!

Contact me if you are interested in learning more about the emboss resist technique, or in purchasing any of these products!

Paper:
Whisper White Cardstock
Basic Black Cardstock

Stamps:
Green House Garden

Inks:
Versamark
Basic Black Classic Ink

Accessories:
White Embossing Powder

Tools:
Heat Tool
Embossing Buddy
Paper Piercer
Mat Pack
Sponge Dauber